We are officially launched!

Hey there, content creators, marketers, and digital enthusiasts!

We’re beyond excited to announce the launch of writerX—your new AI-powered content generation partner designed to supercharge your creative projects and shape the future of the Internet! Whether you’re looking to streamline your blog posts, craft compelling web pages, or automate your entire content strategy, writerX has got you covered.

Why writerX?

At writerX, we believe that content creation should be effortless, powerful, and tailored to your unique brand. That’s why we’ve packed our platform with game-changing features:

Unlimited Projects: Grow without limits — create as much content as your brands need.

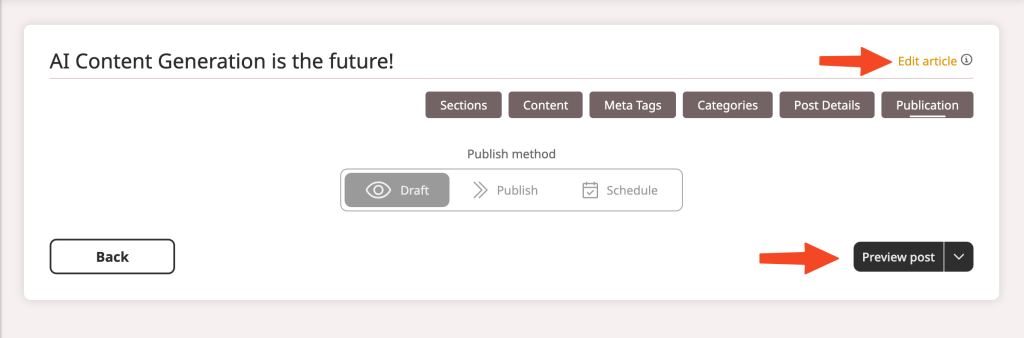
Web Pages & Blog Posts: Effortlessly craft optimized content for your website or blog.

Bulk Content Generation: Scale up with ease—generate batches of content in minutes.

Built-in SEO & Automation: Rank higher and reach more people with automated SEO intelligence.

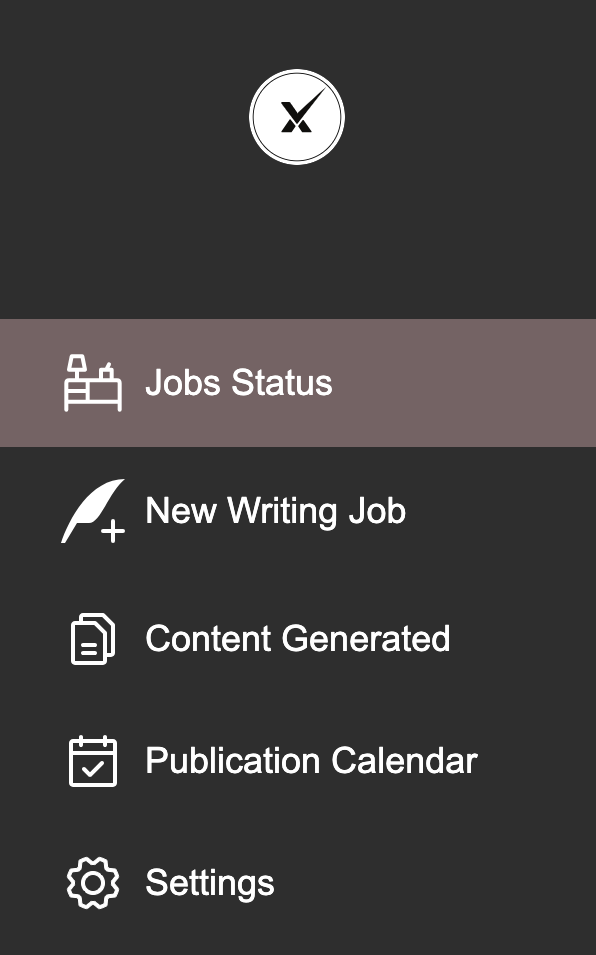
Content Scheduling & Calendar View: Plan ahead and stay on track with both bulk and individual job scheduling, plus a visual calendar view of published content.

Customizable Brand Voices: Let your brand’s personality shine with adaptable tone and style options.

Image Tools: Choose, upload, and create images to match your content seamlessly.

Content Marketing Automation: Automate the heavy lifting and stay focused on strategy.

Roles & Permissions: Manage your team’s access and roles to stay on top of collaboration.

Prompt & Content Templates: Save the patterns you need most often and reuse them with a single click.

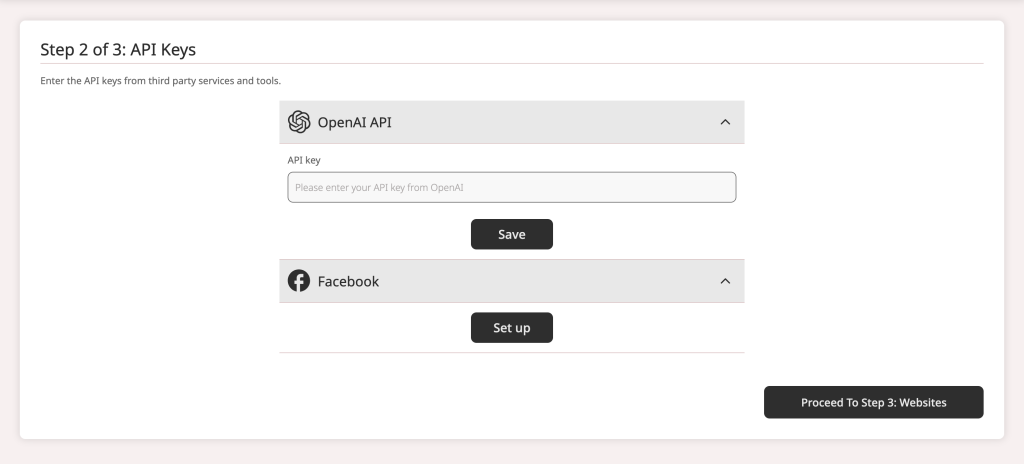
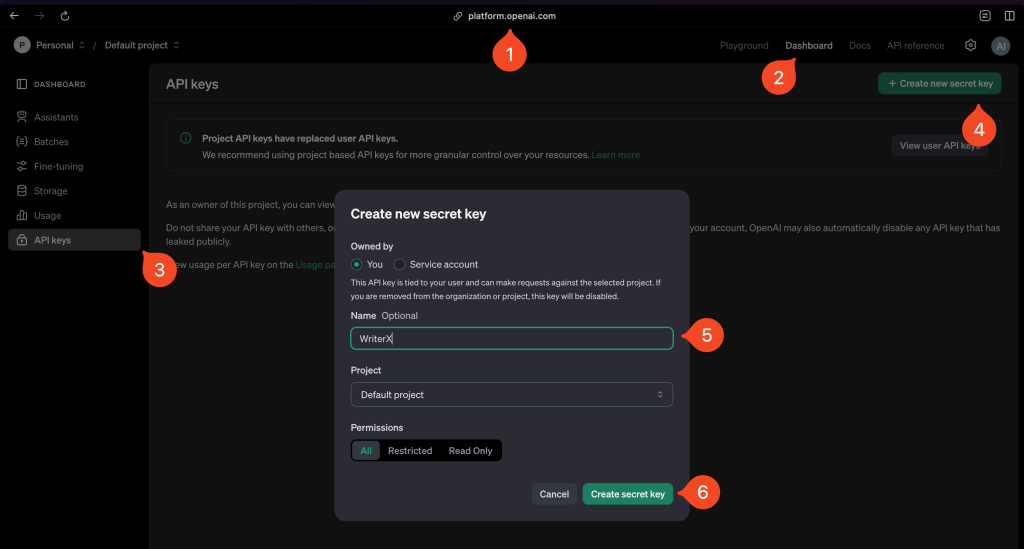
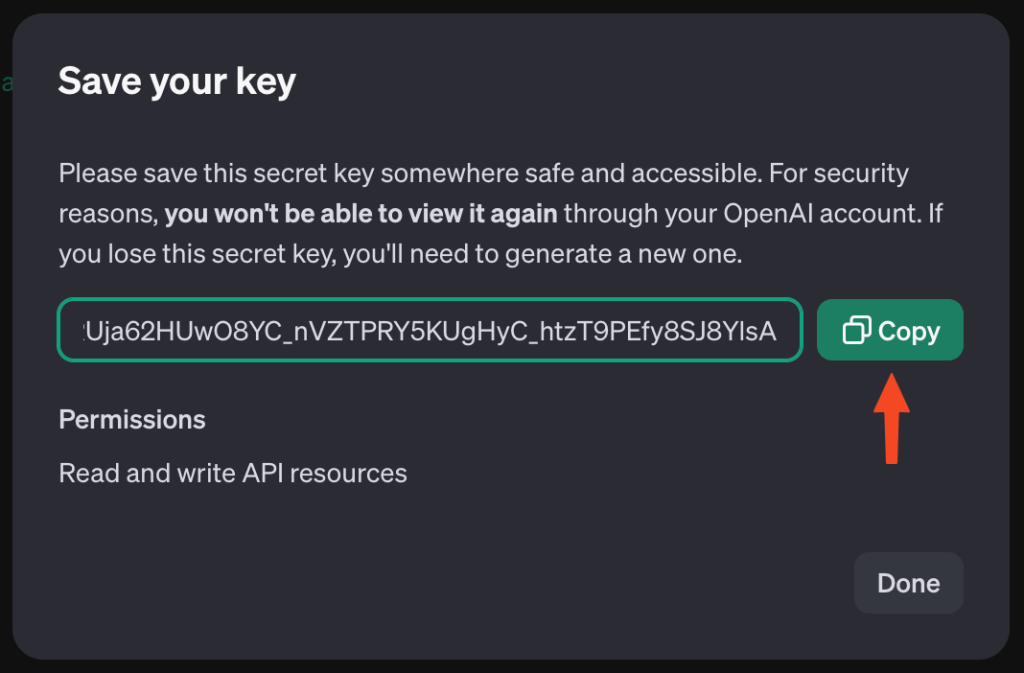
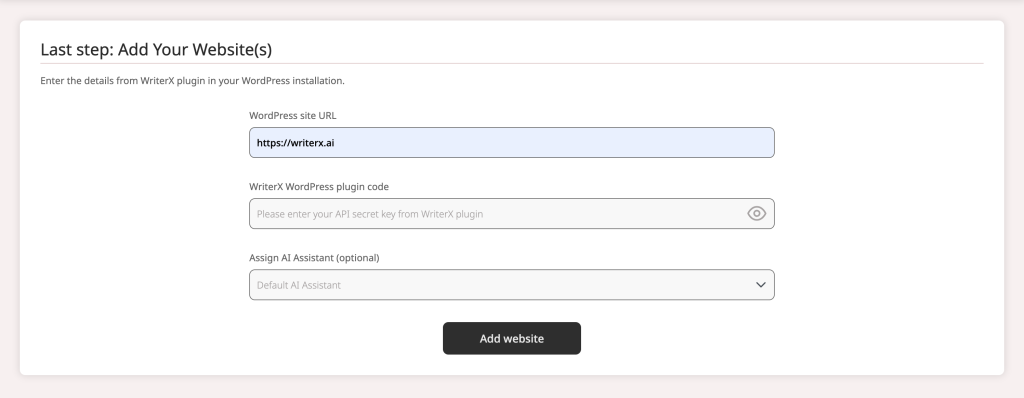
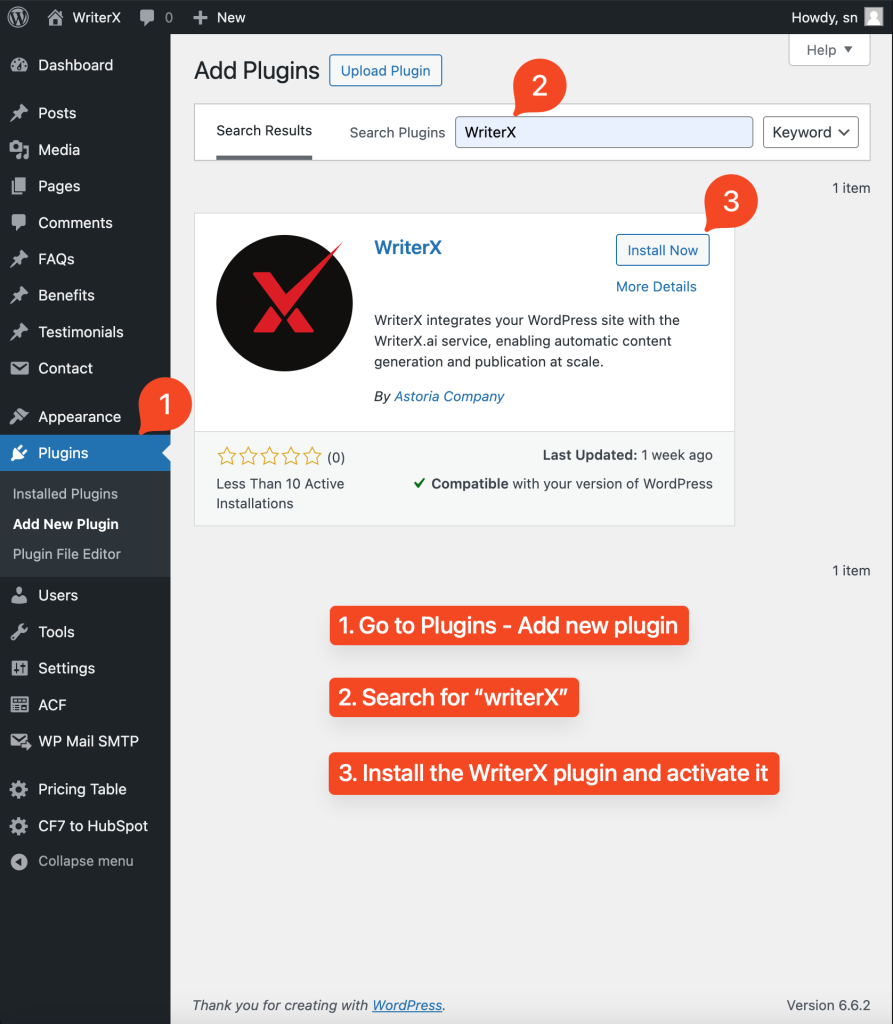
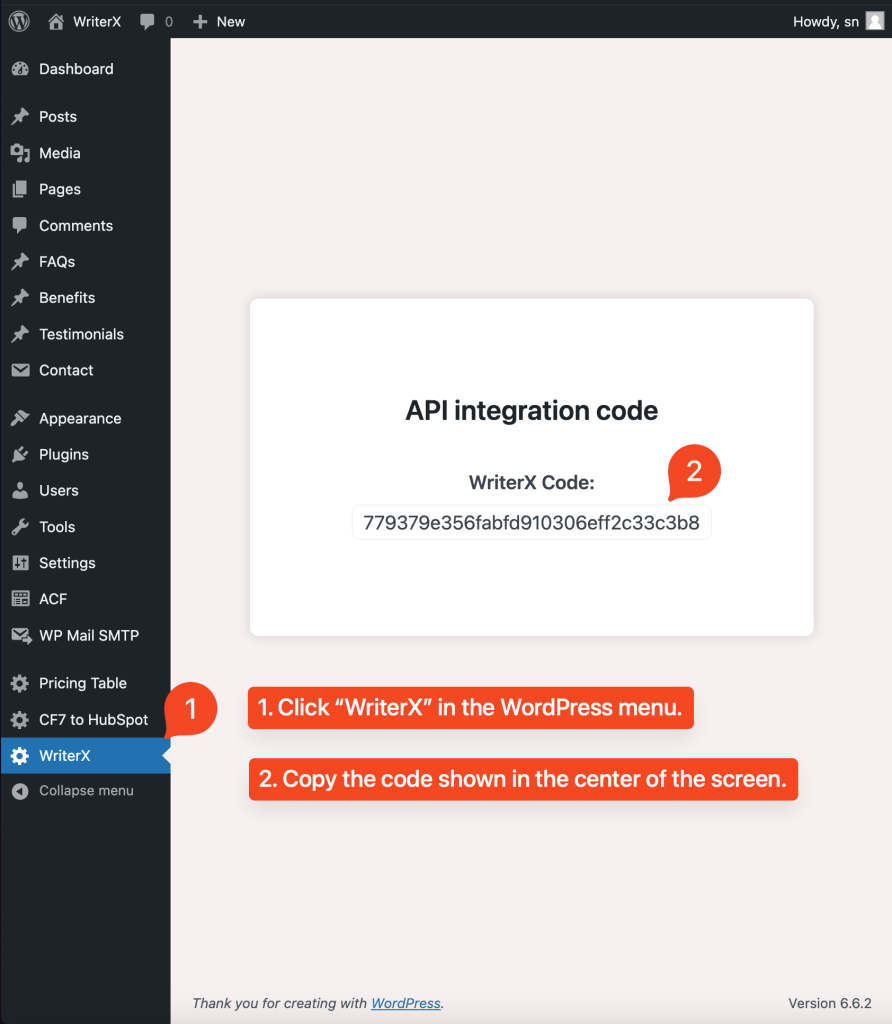
Seamless WordPress Integration: Publish directly to WordPress without missing a beat.

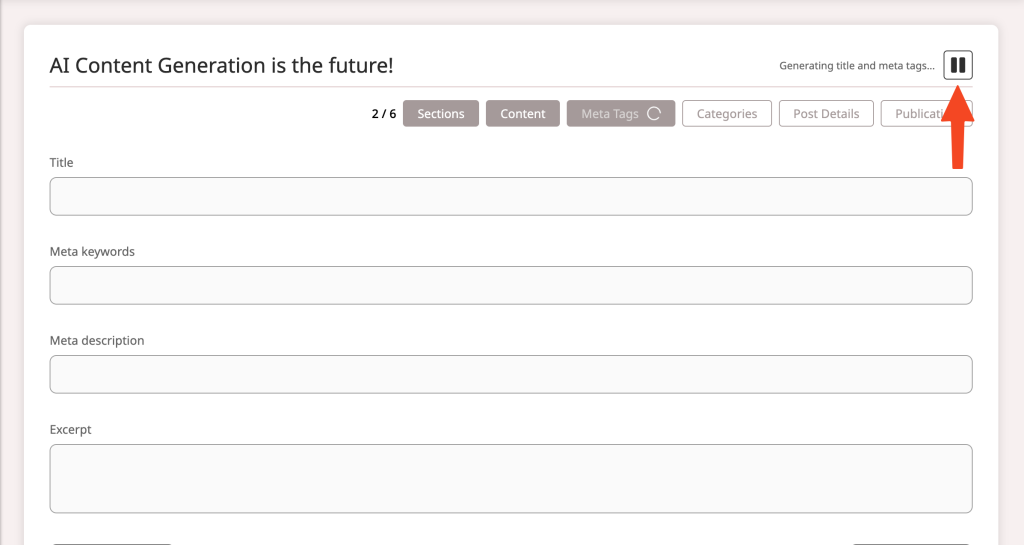
Auto Meta & Title Tags: Boost your SEO game with automatic meta tag generation.

Author Biography Options: Showcase your writers and give your content a personal touch.

Coming Soon:

But we’re just getting started! 🚀 Stay tuned for Video Creation Tools, Social Media & Video Platform Integration, and Advanced Video Import/Upload Options—taking your content game to the next level!

Ready to Join the WriterX Revolution?

We can’t wait for you to experience the magic of writerX. With our platform, you’ll save time, create more, and elevate your brand’s voice like never before. Let’s build the future of digital content together!

Sign up to the writerX app and start creating today, enjoying the free trial week!

Happy writing,
The writerX Team 🎨🚀

Quick Start Guide

This guide will show you how to quickly set up and start using writerX. The setup process is simple and consists of 2 or 3 steps (depending on your chosen subscription plan), taking no more than five minutes.

Setup steps

  1. Sign up and select a plan
  2. Enter your OpenAI API key (if required by the plan)
  3. Connect your WordPress website

1. Sign up and select a plan

WriterX offers two types of subscription plans:

All-included plans: Essential, Growth, or Pinnacle

  • Choose these if you don’t have or don’t want to use your own OpenAI API keys.
  • Note: These plans have monthly limits on content generation.

Self-service plans: Builder, Professional, or WriterX

  • Choose these if you want to use your own OpenAI API keys.

2. Set up API keys (self-service plans only)

If you chose a self-service plan, you’ll need to set up API keys. The only required key is the “OpenAI API” key.

To get an OpenAI API key:

  1. Sign up for an OpenAI account and go to the OpenAI platform
  2. Navigate to the API keys section
  3. Click “+ Create new secret key”
  4. Name your key (e.g., “WriterX”)
  5. Select appropriate permissions (default is usually fine)
  6. Click “Create secret key”
  7. Copy the generated API key immediately
  8. Store it securely (you won’t be able to view it again on the OpenAI platform)
  9. Paste this key into the “OpenAI API key” field in writerX and click “Proceed”

3. Connect your WordPress website

To connect your WordPress website:

  1. Install the WriterX plugin in WordPress:
  • Log in to your WordPress admin dashboard
  • Go to “Plugins” > “Add New”
  • Search for “WriterX”
  • Find the WriterX plugin by Astoria Company
  • Click “Install Now”, then “Activate”
  1. Obtain your API Integration Code:
  • In your WordPress dashboard, click on “WriterX” in the left sidebar
  • Find the “API integration code” section
  • Click on the writerX Code to copy it automatically
  1. Add your website to writerX:
  • Return to your writerX onboarding page
  • Enter your WordPress site URL
  • Enter the WriterX WordPress plugin code
  • Optionally, assign an OpenAI Assistant (the default is fine)
  • Click “Add website” to save your site information

You can either add more sites at this point or complete the setup.

Using writerX

After setup, you can start generating and publishing content:

  • Click “New writing job” to start a new generation job
  • Visit “Job status” to view all completed and running jobs
  • Navigate to “Content generated” to browse all articles written by writerX
  • Under “Settings”, you can add more websites, connect social media, change API keys, and add users to your team.

Generating your first article

  1. In the main sidebar menu click “New writing job”
  1. Choose your website from the dropdown menu
  1. Provide generation settings for the new article:
  • “Topic” is the only required field
  • Review other settings, including article length limits
  • Additional options include:
    • Keyphrase for SEO optimization
    • Post settings (type, template, author) – these are taken from your WordPress website
    • Meta tags and excerpt settings
    • Facebook post generation (if a Facebook page is connected)
    • Featured image generation or selection
    • Category and tag assignment
  1. Adjust generation settings in the sidebar:
  • Choose between “supervised” and “automatic” modes

Note: “Supervised” gives you more control but means you must oversee the process. AI will stop after each step and show you the result for editing and approval, before moving on to the next step. ”Automatic” means exactly what it says – AI will follow the generation sequence without any interference from your side and in the end just offer you the publish / preview link. Note that you will be able to switch between the supervised and automatic modes at any time during the generation.

  • Select publication mode (publish automatically, draft, or schedule)
  • Pick writing tone and style
  • Adjust LLM parameters if necessary
  1. Press “Generate” to start the writing process
  • Use play/pause buttons to switch between automatic and supervised modes during the generation
  • After generation, press “edit” or “preview” to see the post in your WordPress dashboard

Note: If you chose to create a draft, ensure you’re logged in to WordPress before using the “preview” button.